Saturday, February 7, 2015

Umbron is my new Dragon Eye Pendant Design.


UMBRON
Julie has done me really proud once again with her creation of a new Dragon eye. His name is Umbron and I have wrapped him in pure copper. I'm hoping you will like him as much as I do as he is a fantastic colour. His story is below for you.


Umbron was known as a particularly viscious fighting Dragon. What he lacked in size and strength he more than made up for in sheer aggression. Look into his eyes and understand that he will do the unthinkable amongst Dragonkind. He won't just kill you but eat you too. He was destroyed following a match in the fighting cages of Ynysmon where blood lust drove him to attack and kill several high born fight fans.

Ooooh! What a naughty boy Umbron turned out to be! Not all my Dragon stories are sunshine and rainbows. I like them to have a little danger. Lol.


Umbron is now available in my store.

https://www.etsy.com/uk/listing/221753115/umbron-a-blue-dragons-eye-wire-wrapped

Doris - A Rose Quartz Wire Wrapped Pendant.

DORIS
Although she was now 86, Doris still insisted on wearing the black silk underwear that Sam had liked when he was alive. She had no illusions about how time had changed her body but in her mind she was still the same young girl that had raced around Cardiff on the back of Sam's motorcycle. A grin fixed on her face, eyes watering and the wind ruining the hair that she had taken so long making pretty for Sam. Life is what you make of it she said and her life had been an adventure full of opportunity.

https://www.etsy.com/uk/listing/221634265/doris-a-rose-quartz-wire-wrapped-pendant.

Wednesday, February 4, 2015

Pharoah rings Now posted on my Etsy store.

I usually make pendants as I love to make them but some days I get a hankering to make rings. I don't normally sell them as I make them for my own amusement mainly. Very often I send them out to my customers to thank them for orders, especially repeat customers.

I like to make simple rings and there are days that's all I do. I also find it very relaxing to make more complicated designs such as the Pharoah ring. They take a lot longer to make and even more so if I wrap the entire shank.

These are a couple of rings that I have listed in my store today and I hope to list a few more over the coming days.

https://www.etsy.com/uk/listing/221371269/adidron-a-dragon-eye-pharoah-ring-size

Dragon eye pharoah ring


https://www.etsy.com/uk/listing/221367904/tigers-eye-pharoah-ring-size-w-11


Tigers eye pharoah ring

Best wishes - Mark xx

Tuesday, February 3, 2015

My New Etsy Store

I have been trialing 3 different stores to find one that best suits my needs. I have used Selz, Misi and Etsy. Selz has been my main store as it was easy and inexpensive to set up and easy to incorporate social media links.

I have fallen out of love with Selz as they have had a problem with their paypal integration for 6 weeks. That's far too long if you want to sell your items online. Who knows how many sales I may have had in that period?

I know it's only a hobby for me rather than a business but I still need those sales so I can buy in more raw materials. My hobby has become self funding. It allows me to do what I love and really keep my costs down.

Although I have had a couple of sales with both Etsy and Misi I have decided to throw in my lot with Etsy. It is far more well known and established for hobbyists and businesses alike. The costs aren't huge and the exposure for my items is pretty good. It loses out on Facebook integration though it does have some social media links.

I have moved all of my items from Selz and in the process of closing the store permanently with the loss of all the valuable links that I have set up for it over time.

The link to my new Etsy store is - https://www.etsy.com/uk/shop/WireWizardz.

Take a look if you get the chance and leave me any comments on the items and how I might improve them.

Best wishes - Mark xx


Monday, December 1, 2014

Making The Bail For our Wire Wrapped Pendant

Making Wire Wrapped Bails


Following on from my previous post where I showed you how to create the setting for the stone I will now outline a very simple way to make a bail.

Cut around 12" of half round wire. I find that wrapping the wire around my flat nose pliers makes a perfect fit to start wrapping for the bail. Holding the flat side down leave around 2" of wire sticking out to the left.


Using my thumb I will push the wire down and my finger to bend it around.


This can then be hung on the square wires above the setting.


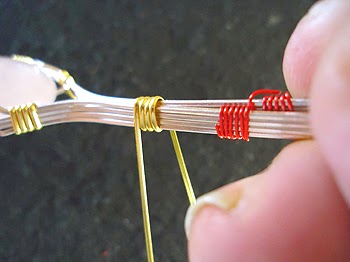
It can now be wrapped around 4 times just like when we did the wraps for the setting. I am leaving my red guide wires on for now as they stop the square wires splaying out and bending before I want them to.


Taking my flat nose pliers I give the wrap a squeeze to tighten and smarten them up. I still want them to be able to move.


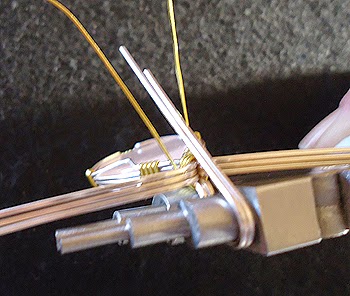
I now want to fix the setting in place and put it under tension to give it strength. A little above the top of the stone I will squeeze the wires together with flat nose pliers.

This will allow me to move the wrap I just did down as far as possible to lock everything together.


Having moved the wrap down I can remove the last of the red guide wires. Separate the front 2 wires and bend them forward a little.


Placing my thumb beneath them I bend them down tight on the wrap until they are sticking out in front. This locks the wrap in place stopping it moving back up.


There will now be 3 wires on each side that must be bent down. On the left side I place my thumb against the wrap again and bend the wires down until they are straight out. Repeat for the right side.


This is how it should look with all the wires bent down.


I like to use my bail making pliers to form the bail as it makes the job simple and uniform each time but any object can be used. Before I invested in bail making pliers I used a pen to create my bails.


Gripping the front 2 wires close to the 2 side wires I use my thumb to bend the wires up and back a little. I find this works much better than trying to use the pliers to make the bend.


Removing my pliers you can see that I have formed a shepherds hook.


Putting my pliers back in I can continue the bend until it is flat against the back of the stone and I can hold it tight with my thumb.


Using the longer of the 2 half round wires I want to wrap it completely around the bail covering the original 4 wires and leaving both wires sticking out at the back.


This is how it looks once I have wrapped it.


Taking my flat nose pliers I will give the wrap a squeeze just to tighten and straighten it.


Crossing over the two half round wires I twist them together for about 10mm.


I can cut off the excess leaving just under 10mm.


Gripping the little 'tail' that I left with my flat nose pliers I twist and straighten them. You have to be a little careful not to over tighten them or they will break off.


Making sure that they are equal, I part the 2 bail wires to give them greater visual interest as well as keeping them in place. If you find one is a little bigger than the other they can be aligned with a gentle tweak of your round nose pliers.


I'm going to tuck away the little 'tail' but before I can do that I need to part the 2 wires that are hanging down the back of the stone.


To tuck away the tail I take my round nose pliers and grip the end of the tail bending down and inwards.


Once I have made the tail into a hook I can easily push down on it which should place it neatly between the legs and up into the bail. It will hardly show from the front and it is a neat way of finishing it off.


I may need to apply a little pressure to the hook with the back of mu pliers to get it to go in far enough out of the way.

The same is true if it feels a little rough. Some gentle pressure with the back of the pliers will flatten it out and make it smooth.


If you are at all worried about it you can apply a small amount of glue once the legs have been pushed back in.


I use my flat nose pliers to bend the two wires in just below the tail to keep it in place.


I know that many jewellery makers give little thought to the back of the stone but I like to pretty it up a bit anyway. Cutting the legs to the size I want I can use my round nose pliers to give them a curl. This not only makes them more attractive but hides any rough edges from the cut. If you are not curling the wires back you may need to use a file or a cup burr to remove any sharp edges.

I will normally press the legs into the back of the stone so that they lie against it well and not stick out.


This is the stage I will do my initial polishing of the wires and stone with my silver cloth. Once I start bending the spare wires down it will be harder to get into all the little spaces with my polishing cloths or my dremel with a polishing wheel.

I will give it a full polishing once it is completed to make sure I remove any fingerprints etc.

That's the end of making the bail. In the next post I will begin bending down the wires into interesting shapes. This is the most fun part for me as I never know what I am going to do until I do it. This keeps my creations unique and different each time.

Tuesday, November 25, 2014

Creating The Setting For Our Wire Wrapped Pendant Part 2

Wire Wrapped Pendant Setting

I'm sorry that it is taking me so long to put all these things together for you but Blogger is only letting me add so many pictures and then it stops working. Any way . . . to carry on from  the last post.

Once I have moved the 2 side wraps into position I will fix them by giving them both a good squeeze with my flat nose pliers. Turning it over I give them another squeeze. That should keep them in place for me.


Offering the wrap up to the stone shows that it is roughly the right shape. The middle wraps are in the right place and I can tweak it if the central wrap has gone off centre.


I will start to form the setting from the back. I like to do the back first as it allows me to sit the stone in it for fitting. Gripping the bottom of the square wires with my flat nose pliers and holding the middle wrap I turn it inwards. I hold the middle because it helps me form a gentle arc with the bend.


As it is the back it isn't so important as when we form the front but it should be looking something like this.


I will now do the same to the other side exactly as the first turning the wire inwards. With every bend there is the chance that it will deform the frame so you have to keep offering it up to the stone and checking. It only takes seconds but it could mean a lot to your wrap.


Having formed the bottom I will move the upper 2 wraps into position near the top of the stone. Once I'm happy with where they are I will fix them in position as earlier with a squeeze either side with the flat nose pliers.


Just as I formed the bottom turns I will do the same with the top using my flat nose pliers. I will still grip the middle wrap between my thumb and finger to create a gentle curve.


And this is how it looks.


Moving to the other side I do the same bending inwards. If you are just starting out it's probably better to bend in less than you think you need as you can always tweak it a bit further.


Because I am using a cabochon it will be flat (ish) on the back and curved on the front. By placing my flat nose pliers into the bend I can ease the wires up allowing for the curvature of the stone. I need to for this for each bend.


The stone should now sit nicely in the setting so that it can be checked for alignment. Holding the top wires together like this I can see that the bottom isn't a tight fit. This can often be sorted by opening the setting and closing it again on the stone. If the gap is still too much a few gentle taps with a plastic headed hammer will fit it tight to the stone.


Sorry the image is a bit blurry but it does make it look like I'm hitting it with the hammer!


After a few taps the stone will be fitting much better. The sides aren't quite so important as they will be pulled in tight when closing the setting but if necessary I will turn it onto it's side for a few taps as well.


Removing the stone I need to form the front of the setting in the same way as the back. I probably won't bend them in quite so much as the back of the setting as that will seat the stone and I only need to hold it down. In bending the wires up to allow for the curvature of the stone I will need to pull them up further than the back. You have to be carfeul using tools this way as it is easy to leave marks on the wires if you use force. Gently lifting them will give you a better finish.


We are creating a cage to hold our stone in place and this is what it looks like once all the wires have been bent for the curvature of the stone.


Inserting the stone back in the setting it may need a little adjustment with the plastic hammer to get it to fit tightly. This is the last chance to make any adjustments to the setting or the placement of the stone as the next step will fix it all in place before making the bail. Taking a minute just to check it all over will save any mistakes later.

In the next post we will start work on the bail and adding some flourishes to make the wrap interesting and (hopefully) beautiful.